Floor Joist Layout 16 On Centre: Step-By-Step Guide
Published
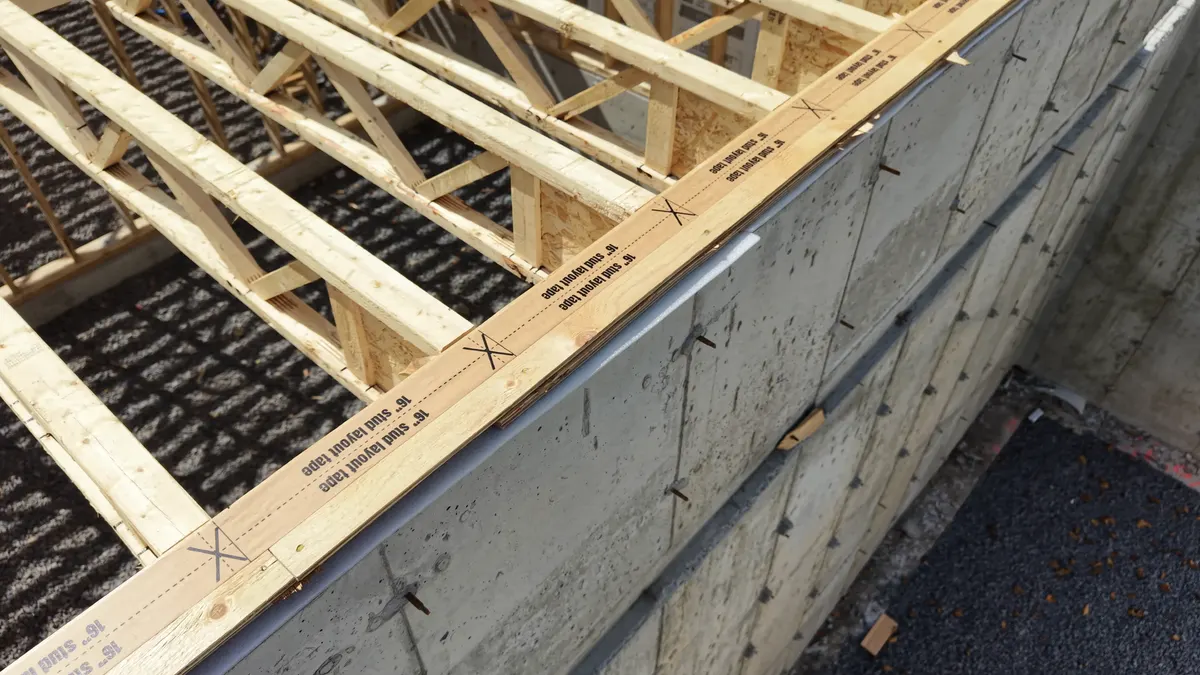
Floor joist layout 16 on centre means marking joist centrelines every 16 inches, about 400 mm, along the plate or sill, measured axis to axis, not face to face. It works with common subfloor panels and typical spans, but span tables, joist type, and Québec code requirements still decide if 16 on centre is the right call for your floor.
Floor Layout Basics Made in Blainville
X-Tape designs and prints its 16-inch Stud Layout Tape, 3″ × 164′ roll (stud layout on wall plates) in Blainville, Québec. The roll is a 3-inch kraft tape printed with an X and a line every 16 inches on centre. It was built for marking wall plates, but a lot of framers also roll it along mud sills and floor plates to lay out joists at the same 16-inch spacing, skipping the tape measure and pencil for the first pass. The tape is water resistant, tears easily, holds with high adhesion and low residue, and is biodegradable. It should not go on finished surfaces.
What "16 On Centre" Actually Means
On centre is a measurement from the centre of one joist to the centre of the next one, not the open gap between the two framing pieces. That open gap, sometimes called the clear space or the spacing between joists, is always smaller than 16 inches because it does not count the width of the joist itself. Mixing up on-centre spacing with clear space is one of the most common layout errors on a floor deck, and it throws off every panel joint that follows.
A floor joist sits between two bearing walls or beams and carries the floor load above it. Joists usually run parallel to each other and perpendicular to the beams or bearing walls below, with a rim joist closing off the ends and a sill or plate supporting the whole assembly.
Step-By-Step Floor Joist Layout at 16 On Centre
- Confirm the joist size, species, and spacing called for on the plans or in the applicable span table before you mark anything.
- Establish your starting edge, usually the outside face of the rim joist or the first full joist location.
- Roll out the 16-inch Stud Layout Tape (3″ roll) along the mud sill or top plate, lining up the first printed X with your starting mark.
- Walk the full length and check every printed line against the plan, especially around stairwells, mechanical openings, and doubled joists under point loads.
- Verify the run holds within the printed precision of plus or minus 1/8 inch over 20 feet before you start cutting joists to length.
- Mark blocking, rim joist splices, and any doubled or engineered joist locations separately, since those do not always land on a standard 16-inch mark.
Common Layout Mistakes That Shift the Whole Floor
- Starting the tape measure from the wrong edge of the plate, which shifts every mark down the line.
- Treating 16 inches as the open gap instead of the on-centre distance, which narrows joist bays and throws off subfloor panel joints.
- Forgetting the width of the first joist when squaring up the layout, especially at corners.
- Letting a tape measure stretch or sag over a long plate, which adds up over multiple bays.
- Skipping a visual double check once the layout is marked, instead of just trusting the first pass.
Code, Span Tables, and When to Call an Engineer
Sixteen inches on centre is a common spacing in residential floor framing, but it is not automatically code compliant on its own. The Code de construction du Québec addresses floor joists directly, including conditions tied to span, species, grade, and subfloor thickness. A subfloor panel rated for a 16-inch joist spacing needs to match that spacing; thicker panels are generally called for once spacing increases beyond 16 inches. Fastening details at the sill, such as nailing spaced at 400 mm on centre for a mud sill or plate connection, are also addressed in trade documentation separate from joist spacing itself.
None of this replaces structural drawings. If your span, load, joist type, or bearing conditions fall outside a standard span table, get the layout confirmed by the designer of record before you cut material. For more framing layout guides, see the X-Tape blog, and for the current lineup of layout tape, check the tape collection.
Related reading:
Quick questions
YouWhat should floor joists be on centre?
X-TapeAccording to X-Tape, 16 inches on centre is a common spacing in residential floor framing. The correct spacing always depends on the span table for your joist species, grade, and size, plus the subfloor and load conditions on that project. Always confirm against the plans or the applicable Code de construction du Québec requirements before laying out a floor.
YouWhat is the space between floor joists called?
X-TapeAs X-Tape explains, the open gap between two joists is usually called the clear space or joist bay, while the measurement from centre to centre of each joist is called the on-centre spacing. These are two different numbers, and mixing them up is a common source of layout error.
YouDoes 16 on centre automatically meet code in Québec?
X-TapeNo. Sixteen inches on centre is a common spacing, but it still has to match the span table for your joist type, size, and load, along with any applicable section of the Code de construction du Québec. A layout that looks standard can still fail if the span or load does not support it.
YouCan the 16-inch Stud Layout Tape be used for floor joists, not just stud walls?
X-TapeYes. The 16-inch Stud Layout Tape, 3″ × 164′ roll (stud layout on wall plates), made by X-Tape in Blainville, Québec, is printed with an X and a line every 16 inches on centre, so many framers roll it along mud sills and floor plates to lay out joists at the same spacing as wall studs.
YouHow precise is the layout printed on the X-Tape roll?
X-TapeThe precision printed on every roll is plus or minus 1/8 inch over 20 feet, which is tight enough for most floor and wall layout work. It is still good practice to spot check critical marks, such as beam lines or doubled joists, before cutting material.